Have You Been Eating Dry, Flavorless Chicken All Your Life? Here's How to Change That Forever
Are you tired of serving dry, tasteless chicken breasts that no amount of sauce can save? What if I told you there's a simple technique professional chefs have been using for years that can transform ordinary chicken into succulent, flavor-packed perfection? The secret lies not in the cooking method, but in what happens before your chicken ever touches heat. Let me introduce you to the game-changing technique of brining.
Overview: The Magic of Brining Chicken Breasts
Brine chicken breasts is a transformative process that takes ordinary poultry and elevates it to restaurant-quality status. This technique requires just 30 minutes to overnight of preparation time, but the results are absolutely worth it. The difficulty level is beginner-friendly, making it accessible for all home cooks who want to significantly improve their chicken dishes. Brining works by using the science of osmosis to infuse moisture and flavor deep into the meat, ensuring juicy results even if you accidentally overcook the chicken slightly.
Essential Ingredients: The Perfect Brine Formula
A perfect chicken brine combines salt, sugar, and aromatics in balanced proportions:
- Kosher salt (¼ cup): The foundation of any brine. Kosher salt is preferred for its pure flavor and larger crystals that dissolve easily. Table salt can be substituted at a reduced amount (about 3 tablespoons).
- Granulated sugar (3 tablespoons): Balances the saltiness and promotes browning. Brown sugar or honey (2 tablespoons) makes excellent alternatives.
- Cold water (4 cups): The vehicle for all flavors. Always use cold water to prevent bacterial growth.
- Aromatics: Garlic cloves (4, smashed), black peppercorns (1 tablespoon), bay leaves (2), and fresh herbs like thyme or rosemary sprigs create a flavor foundation.
- Citrus (optional): Lemon or orange slices add brightness.
- Additional flavor boosters (optional): Apple cider vinegar (2 tablespoons), soy sauce (2 tablespoons), or Worcestershire sauce (1 tablespoon) can add depth.
The salt and sugar are non-negotiable, but feel free to customize the aromatics based on your recipe's final flavor profile.
Step-by-Step Instructions: Brining Made Simple
Prepare your brine solution:
- Combine 1 cup of water with the salt and sugar in a saucepan
- Heat gently while stirring until completely dissolved (about 2 minutes)
- Remove from heat and add your chosen aromatics
- Add the remaining 3 cups of cold water to cool the mixture quickly
- Allow the brine to cool completely before using (accelerate by adding ice cubes)
Prepare your chicken breasts:
- Trim any excess fat or unwanted portions
- Pat dry with paper towels
- If breasts are very thick, consider butterflying or pounding to even thickness for more uniform brining
Submerge chicken in brine:
- Place chicken breasts in a non-reactive container (glass, plastic, or stainless steel)
- Pour the cooled brine over chicken until fully submerged
- Cover container with lid or plastic wrap
- Refrigerate for 30 minutes (quick brine) to 4 hours (standard brine)
- Avoid brining longer than 8 hours as chicken can become mushy
Rinse and dry:
- Remove chicken from brine and rinse thoroughly under cold water
- Pat completely dry with paper towels (crucial for proper browning)
- Let sit at room temperature for 15 minutes before cooking
Pro tip: For extra-juicy results, use lukewarm (not hot) brine for 15 minutes instead of cold brine for 30 minutes. The warmer temperature accelerates the brining process but requires careful time management to prevent "cooking" the chicken.
Assembly: From Brine to Plate
After brining, your chicken is ready for your preferred cooking method:
Seasoning: Since the chicken is already infused with salt, use a lighter touch with additional seasonings. Herbs, spices, and pepper work well.
Cooking options:
- Roasting: 375°F for 20-25 minutes until internal temperature reaches 165°F
- Grilling: Medium-high heat, 6-7 minutes per side
- Pan-searing: Medium-high heat, 5-6 minutes per side, finishing in a 350°F oven if needed
- Air-frying: 375°F for 10-12 minutes, flipping halfway
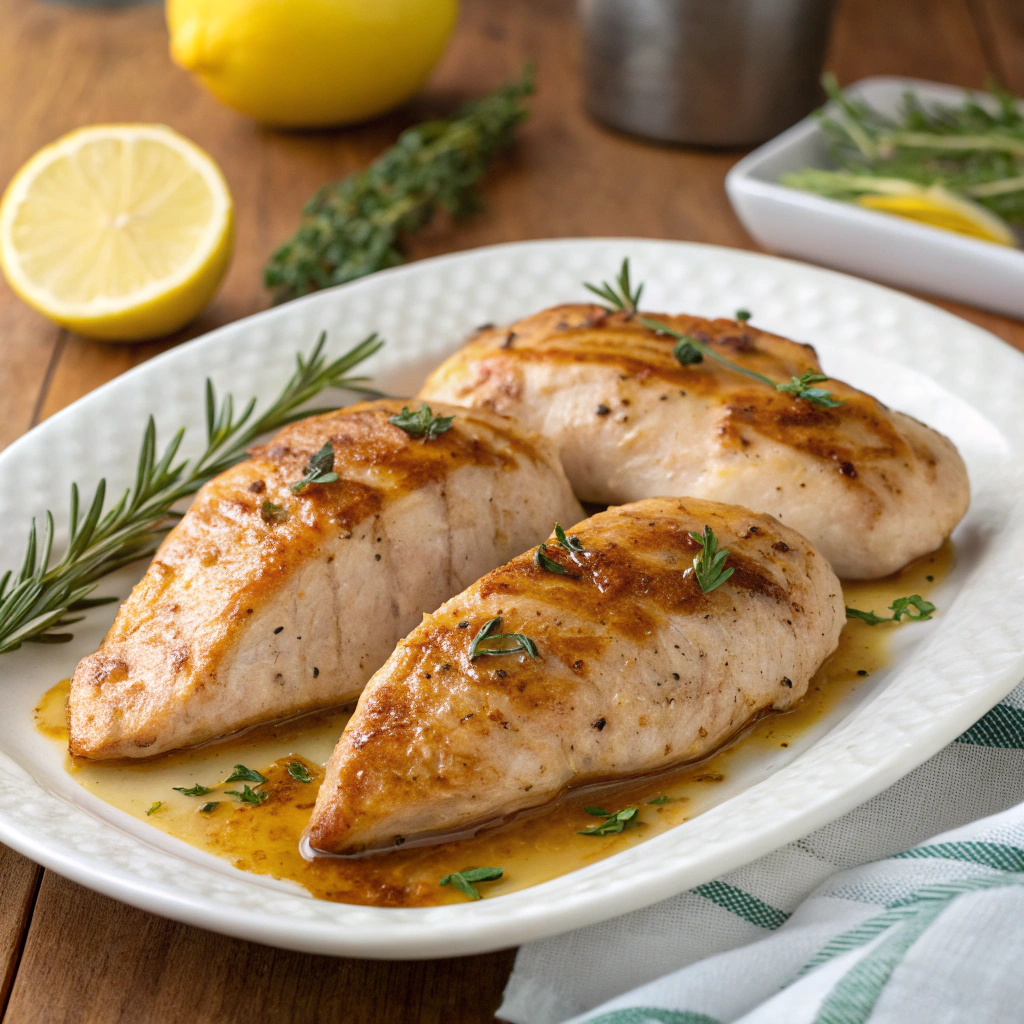
Presentation: For an impressive serving, slice the chicken against the grain and fan it out on a platter. Garnish with fresh herbs that complement your brine flavors and a light drizzle of olive oil or pan sauce.
Storage and Make-Ahead Tips
- Make-ahead brining: Prepare the brine up to 3 days in advance and store refrigerated.
- Brined chicken storage: After brining, chicken can be patted dry and refrigerated for up to 24 hours before cooking.
- Cooked brined chicken: Keeps in the refrigerator for up to 3 days. Reheat gently in a 300°F oven with a splash of water to maintain moisture.
- Freezing option: Brined and cooked chicken can be frozen for up to 2 months. Thaw overnight in the refrigerator.
Recipe Variations: Making It Your Own
- Citrus Herb Brine: Add orange and lemon slices, rosemary, and thyme for Mediterranean-inspired chicken.
- Asian-Inspired: Include soy sauce, ginger slices, star anise, and a touch of honey.
- Spicy Southwest: Add jalapeño slices, cumin seeds, cilantro stems, and a splash of lime juice.
- Buttermilk Brine: Replace half the water with buttermilk for Southern-style chicken that's incredibly tender.
- Apple Cider Brine: Use apple cider instead of water with cinnamon sticks and cloves for a fall-inspired flavor profile.
The Gateway to Perfect Chicken Every Time
Now that you've mastered the art of brining chicken breasts, you'll never have to endure dry, flavorless poultry again. This simple technique requires minimal effort but delivers maximum results, proving that sometimes the most important part of cooking happens before you even turn on the heat. Experiment with different flavor combinations and cooking methods to find your perfect match. Your friends and family will wonder what your secret ingredient is – but you'll know it's all about giving your chicken a luxurious salt-water spa treatment before cooking. Happy brining!


