The Secret to Juicy Poultry Every Time: Mastering the Art of Brining
Have you ever wondered why restaurant chicken always seems more flavorful and juicy than what you make at home? What if I told you that professional chefs aren't using fancy ingredients, just a simple technique that transforms ordinary poultry into extraordinary meals?
Overview: Why Brining is Your Culinary Secret Weapon
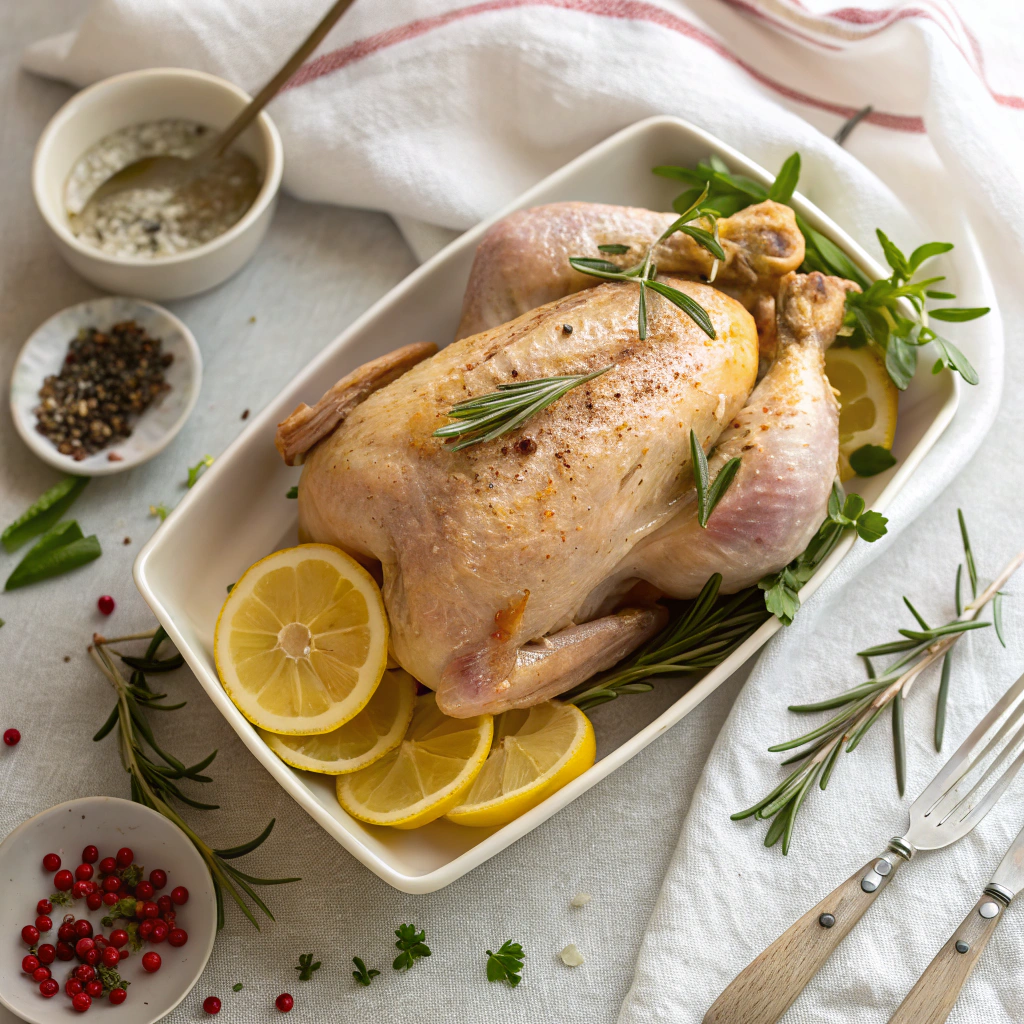
Brine chicken is the culinary technique that separates amateur cooks from seasoned professionals. This method involves soaking chicken in a salt solution before cooking, allowing the meat to absorb moisture and flavor that remains even after cooking. With just 15-30 minutes of active preparation and 2-24 hours of brining time, this medium-difficulty technique yields remarkably tender, juicy results that will revolutionize your chicken dishes forever.
Essential Ingredients: The Science of Perfect Brining
For the Basic Brine (for 4-5 pounds of chicken):
- 4 cups cold water
- ¼ cup kosher salt (not table salt)
- 2 tablespoons granulated sugar
- 1 tablespoon black peppercorns
- 3 cloves garlic, crushed
- 2 bay leaves
- 1 lemon, sliced
- 2 sprigs fresh rosemary or thyme
Why These Ingredients Matter:
Kosher salt: The cornerstone of any brine, kosher salt has larger crystals than table salt and doesn't contain iodine, which can impart a metallic taste. The salt creates an osmotic environment that helps chicken cells retain moisture.
Sugar: Balances the saltiness and promotes browning when cooking. It also helps tenderize the meat by breaking down muscle fibers.
Aromatics: Garlic, herbs, and spices infuse subtle flavors into the meat during the brining process.
Substitutions and Variations:
- Replace kosher salt with sea salt at the same ratio
- Brown sugar can substitute for white sugar for a deeper flavor
- No fresh herbs? Use 1 teaspoon dried herbs instead
- Swap lemon for orange slices for a different citrus note
- For a dairy-based brine, replace 1 cup of water with buttermilk
Step-by-Step Instructions: Brining Like a Pro
Basic Preparation:
Create the brine base: In a large pot, heat 1 cup of the water with salt and sugar until completely dissolved (about 2-3 minutes). This ensures even distribution of flavors.
Add aromatics: Stir in peppercorns, crushed garlic, bay leaves, lemon slices, and herbs.
Cool the mixture: Add the remaining 3 cups of cold water and let the brine cool completely. Using warm brine can promote bacterial growth.
Prepare the chicken: Rinse chicken pieces under cold water and pat dry with paper towels.
Immerse in brine: Place chicken in a large non-reactive container (glass, ceramic, or food-grade plastic) and pour the cooled brine over it. Ensure all pieces are completely submerged.
Refrigerate: Cover and refrigerate for the appropriate time:
- Whole chicken: 8-24 hours
- Bone-in pieces: 3-4 hours
- Boneless pieces: 2-3 hours
- Chicken breasts: 1-2 hours
Pro Tips:
- For larger cuts, double the brine recipe
- Never brine longer than recommended as meat can become mushy
- Always keep brining chicken refrigerated between 34-40°F
- If space is limited, use a large zip-top bag placed in a bowl (in case of leaks)
- For extra juiciness, add ½ cup apple juice to the brine
Assembly: From Brine to Plate
Remove from brine: Carefully lift the chicken from the solution. Discard the used brine.
Rinse thoroughly: Rinse the chicken under cold running water to remove excess salt from the surface.
Dry completely: Pat the chicken thoroughly dry with paper towels. This crucial step ensures crispy skin when cooking.
Rest before cooking: Let the chicken rest, uncovered, in the refrigerator for 30 minutes to 1 hour. This allows the surface to dry further and the salinity to equalize throughout the meat.
Cooking preparation: Season the chicken lightly (remember, it already contains salt from brining) with pepper and your preferred herbs or spices.
Plating and Presentation Tips:
- Brined chicken develops a beautiful golden-brown color when roasted
- Garnish with fresh herbs that complement those used in your brine
- A light drizzle of high-quality olive oil adds a professional finishing touch
- Let roasted chicken rest 10 minutes before slicing to redistribute juices
Storage and Make-Ahead Tips
- Raw brined chicken: Can be kept refrigerated for up to 2 days before cooking
- Cooked brined chicken: Stays juicy for up to 4 days when refrigerated in an airtight container
- Freezing: Pre-brine chicken before freezing for best results; defrost in refrigerator before cooking
- Make-ahead brine solution: Can be prepared up to 1 week in advance and stored refrigerated
Recipe Variations: Beyond Basic Brining
Asian-Inspired: Add 2 tablespoons soy sauce, 1 tablespoon rice vinegar, 2 star anise, and 1-inch sliced ginger to the basic brine.
Mediterranean: Include 2 tablespoons olive oil, 1 tablespoon dried oregano, 2 teaspoons red pepper flakes, and the zest of 1 lemon.
Buttermilk Southern: Replace half the water with buttermilk and add 1 tablespoon hot sauce, 1 teaspoon smoked paprika, and 1 teaspoon garlic powder.
Herb Garden: Double the herbs by adding 2 sprigs each of thyme, rosemary, sage, and parsley.
Sweet and Spicy: Add 2 tablespoons honey, 1 tablespoon apple cider vinegar, and 1 sliced jalapeño pepper.
Conclusion: Your Path to Perfectly Brined Chicken
Now that you understand the transformative power of brining, you're equipped to elevate ordinary chicken to restaurant-quality status. The beauty of brine chicken is its adaptability—once you master the basic technique, you can customize endless flavor profiles to suit your taste preferences and the seasons.
Remember that patience is key with brining; the extra time invested pays dividends in flavor and texture. Don't be afraid to experiment with different aromatics and spices to create your signature brine. Your family and dinner guests will soon be asking for your chicken secrets, and you'll smile knowing it all comes down to this simple but transformative technique.


